Inside the playbook: defeating man-pressure
Today: Defeating man-pressure
Click here for the previous edition of Inside the Playbook.
Previously, we have broken down some of the more popular zone coverages in the NFL: the Tampa 2, Cover 3 and used an example of the open side fire zone to break down the basics of zone blitzing.
Today, let’s look at how teams can combat man-to-man pressure or Cover 1 pressure (free safety in the middle of the field), using the chalkboard and a video clip of Arizona Cardinals WR Larry Fitzgerald working against man-pressure from the Chicago Bears in the red zone—along with some coaching points.
Let’s set it up. The Cardinals are in their Posse or 311 personnel (3 WR, 1 RB, 1 TE) vs. the Bears base Nickel defense (4 DL, 2 LB, 5 DB). As we will talk about when we get to the coaching points, all 4 receivers in the ‘Zona offensive set are inside of the numbers—which is the perfect set up for them to run Hi-Lo Crossers. A classic man-to-man beater in the NFL.
Let’s take a look at the route on the chalkboard and then break it down…
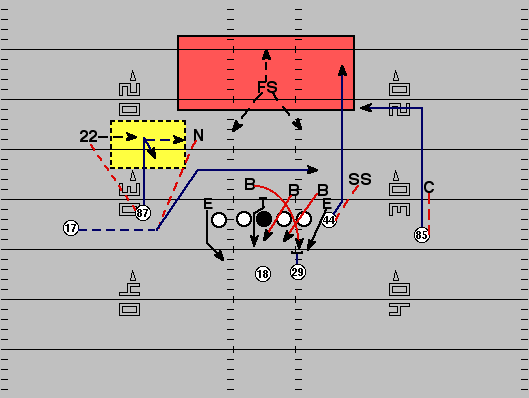
As we can see, Fitzgerald is aligned inside the numbers as the “X” receiver with a reduced split (close to the core of the formation). The “W” receiver, Early Doucet, comes in motion to create a bunch look to the closed (or strong) side with the TE, or “Y” receiver, and Steve Breaston, the “Z” receiver.
Let’s break down the route looking at the bunch formation first. The “Y” runs a 10-yard dig route (square-in), the “Z” runs a hard underneath crosser, and the “W” (coming in motion) runs a simple flat route as the No.3 receiver to the closed side.
That leaves Fitzgerald. He releases hard inside off of the ball to beat Bears’ CB Charles Tillman and uses the underneath crosser by Breaston to “rub” the corner.
But, why does it work? In the diagram, I used a red pen to highlight the coverage responsibilities on the Bears secondary. They are in a Cover 1 pressure with both linebackers (Mike, Will) blitzing the “A” gaps. The free safety plays the deep middle of the field, and each defender will use outside leverage—to funnel everything towards their free safety help.
However, a Cover 1 pressure is different than playing the standard version of man-free defense. With both linebackers in the blitz front, the only help for the secondary is in the deep middle of the field. In a standard version of man-free, there is a “rover” or a player who drops to the middle hook between the hashes. In this scheme, that defender can knock off any underneath crossers.
In reality, Tillman got beat by the offensive scheme vs. the defensive scheme. He played his leverage from outside-in and closed to the hip of Fitzgerald after the catch. But, he didn’t finish the play.
Let’s check it out on the video replay…
Some coaching points…
Offensive alignment
As we discussed above, the Cardinals’ receivers are aligned inside of the numbers. As a defender, that tells you to be alert for inside breaking routes. The only routes that a receiver can run to the outside from this alignment are a fade and maybe a comeback in the red zone. This should tell the corners to stay tight to their coverage off of the line of scrimmage—and run to the hip.
The “bunch” look
Why motion to the bunch? The first thing is to tell QB Kurt Warner what the Bears are playing. By using pre-snap motion to form the bunch to the closed side, Warner can see the nickel back move with Doucet, which tells him the Bears are in some form of man-coverage. The two LBs showing blitz can be a disguise, but when the nickel moves with a receiver, the secondary is now exposed. Information that the offense needs vs. Tampa 2 teams such as Chicago.
Blitz pick-up
The Bears are sending 6-man pressure against the Cards. Arizona responds by using 6-man protection and RB Tim Hightower steps up into the open (or weak) side “A” gap to take on the blitzing Mike Backer. It is simple and it doesn’t get a lot of pub on TD plays, but as you can see from the video replay, it is a crucial block. Hi-Lo Crossers isn’t a quick developing route like a 3-step slant or a fade—and the protection has to be there.
The basics of Hi-Lo Crossers
Every NFL team has a version of this route in their playbook. You will see a high volume of Hi-Lo Crossers from west coast offenses, but the basics remain the same. Force defenders to chase receivers underneath with routes designed to cause confusion—and to knock players off. I saw plenty of it during my own career and have been on the losing end of it often. It may look like something drawn in the sand, but from a player’s perspective, it can eat up man-coverage.
Follow me on Twitter: MattBowen41
